Exercises
0 of 32 done. Work through most of a level before you move on; the later exercises build on the earlier ones.
Tick exercises off and make notes freely — it is kept for this browser session. Create a free account to keep your progress for good.
Level 1 · Getting started
0/8Learning to look, and getting to know your materials.
Blind contour drawing observation 20 min
The point. Teach your hand to follow what your eye sees instead of what you think you see.
Where to get your subject
Put a shoe, your own hand or a crumpled sheet of paper in front of you.
You need
- Pencil
- Paper
- A hand, a shoe or a crumpled sheet of paper
How to go about it
- Put the object down and look at it without looking away.
- Draw the outline in one continuous line without looking at your paper.
- Move your pencil as slowly as your eye moves.
- Repeat five times with different objects.
Where it goes wrong
- Sneaking a look
- Going too fast, which turns observation into guesswork
Done when
- Your drawing is wrong, but the line clearly follows real detail
- You made five drawings without peeking
Measuring proportions with your brush observation 30 min
The point. Take measurements across instead of guessing at them.
To paint from
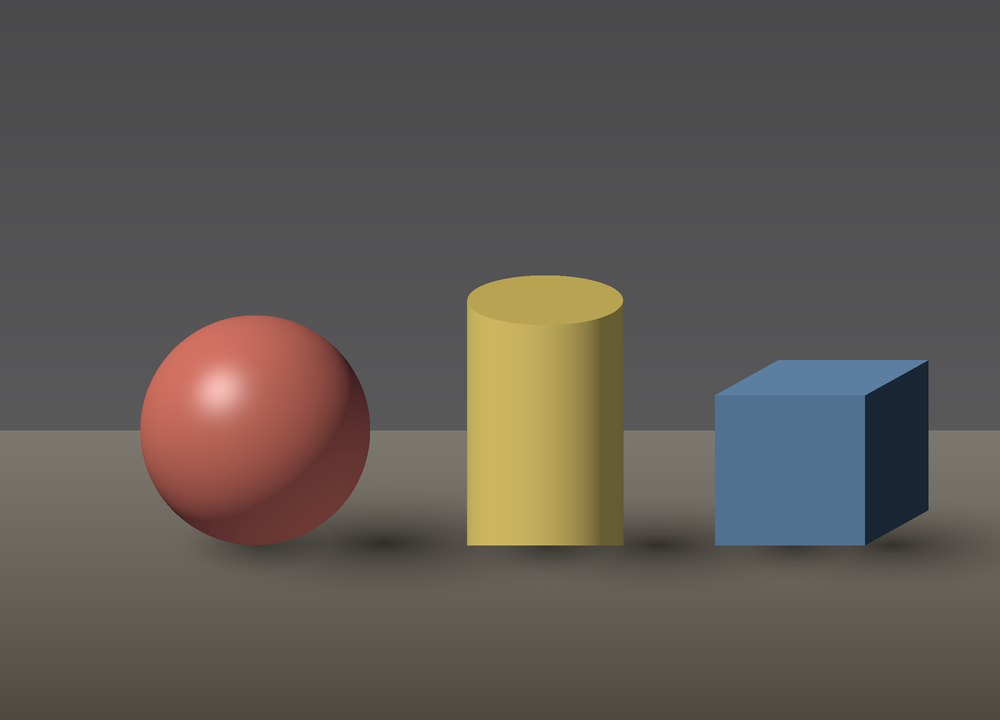
Measure the proportions of these three shapes before you start.
Take it apart
You need
- Pencil or brush handle
- Paper
- A still life of three objects
How to go about it
- Stretch out your arm, close one eye and measure the width of the smallest object against your pencil.
- Use that length as the unit for measuring everything else.
- Put the outer boundaries on paper first, then the positions relative to each other.
- Check your work afterwards by measuring again.
Where it goes wrong
- Bending your elbow, which changes the unit
- Drawing detail before the proportions are right
Done when
- The height-to-width ratio is right to within about ten percent
- You measured rather than estimated
A nine-step value scale value 45 min
The point. Learn to mix in even steps from white to black.
To paint from
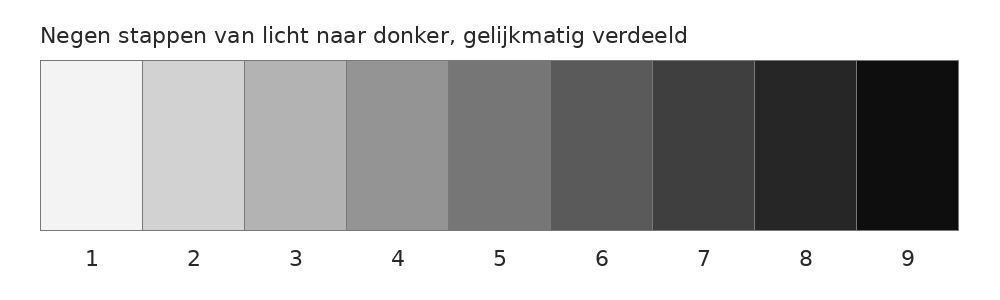
Nine even steps. Hold your own scale up against this one.
Take it apart
You need
- Black and white (oil) or a single dark pigment (watercolor)
- Paper or panel
How to go about it
- Draw nine squares of five by five centimeters.
- Fill square 1 with your lightest and square 9 with your darkest value.
- Mix square 5 as the exact middle value.
- Then fill 3 and 7, and finally the rest.
- Squint at it: every step should look the same size.
Where it goes wrong
- Adding too much dark; dark is almost always stronger than you think
- In watercolor: too little water in the light steps
Done when
- Nine clearly distinguishable steps
- The steps are even, with no jump in the middle
Sphere, cube and cylinder in gray value 60 min
The point. Recognize and paint the five values of a lit form.
To paint from
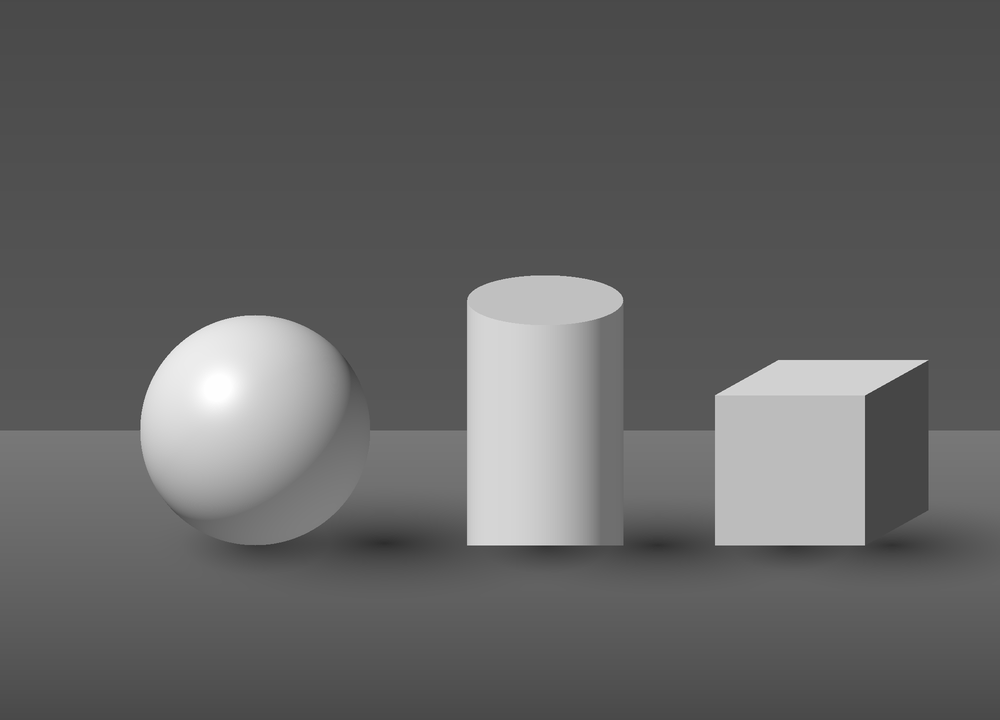
Sphere, cylinder and cube under one light source. Find the five values on each.
Take it apart
You need
- White plaster casts or simple objects
- One lamp
- Black and white
How to go about it
- Put a single lamp off to one side.
- Paint in grays only.
- Find all five on each form: light, half-tone, core shadow, reflected light and cast shadow.
- Keep the core shadow darker than the reflected light.
Where it goes wrong
- Making reflected light too light, which flattens the form
- Making the cast shadow as dark as the core shadow
Done when
- The forms read as round without an outline
- You can point to all five values
Learning to meter your water materials 30 min
The point. Feel how much water is on your brush and how much is on your paper.
You need
- A single pigment
- 300 gsm watercolor paper
- Round brush, size 8 or 10
How to go about it
- Lay four washes: very thin, thin, medium and full.
- Put them side by side and let them dry.
- Note down how much water you used for each strip.
- See how much lighter everything dries.
Where it goes wrong
- Working on paper that is too thin, which buckles
- Forgetting that watercolor dries up to thirty percent lighter
Done when
- Four clearly different strengths
- You can repeat a wash and hit the same strength again
Taking stock of your brushstrokes brushwork 30 min
The point. Find out what each brush can do before you use it in a painting.
You need
- All of your brushes
- One color
How to go about it
- Make a row of strokes with each brush: tip, flat, side, twisting, dry.
- Vary the pressure from light to heavy.
- Write the name and size of the brush next to each row.
Where it goes wrong
- Only ever working with the tip
- Always reaching for the same brush
Done when
- You have at least five different strokes from every brush
- You know which brush to pick up for a soft edge
Make your own mixing chart color 90 min
The point. See what your tubes actually do, rather than what you expect them to do.
Where to get your subject
No reference needed: you are working with your own tubes.
You need
- Your whole palette
- Paper or panel
- Ruler
How to go about it
- Lay your pigments out along the top and the side of a grid.
- Mix every pair in equal parts and fill in the square.
- Do the lower half of each square again with a little white or extra water.
- Write the pigment names in and keep the chart by your easel.
Where it goes wrong
- Forgetting to write the names down
- A dirty brush, which contaminates the colors
Done when
- Every pair from your palette is on the chart
- The chart hangs where you can see it while you work
Notan in two values composition 30 min
The point. See the structure of an image as shapes rather than as objects.
To paint from

A composition in exactly two values. Make three variations of your own.
Take it apart
You need
- Black ink or dark paint
- Small paper
How to go about it
- Pick a photo or a view.
- Divide everything into exactly two values: light or dark, nothing in between.
- Make three versions of the same subject with different divisions.
- Pick the strongest and write down why.
Where it goes wrong
- Using gray
- Adding detail
Done when
- Only black and white on the paper
- The image still reads from a meter away
Level 2 · Finding your footing
0/8Value, a limited palette and the basics of your medium.
Painting the negative space observation 45 min
The point. Get shapes right by looking at what surrounds them.
Where to get your subject
Put a chair or a plant against the light.
You need
- A chair, a plant or a bicycle frame
- One color of paint
How to go about it
- Paint only the space between and around the object.
- Leave the object itself untouched.
- Check whether the shape that is left over is right.
Where it goes wrong
- Starting to follow the outline of the object after all
Done when
- The object is recognizable without your having painted it
A value study in five tones value 60 min
The point. Translate a photo into five values before you touch color.
To paint from
Translate this set-up into five gray values first.
Take it apartYou need
- Reference photo
- Black and white, or a single dark pigment
How to go about it
- Mix five values and stick to them strictly.
- For each shape, decide which of the five comes closest.
- Paint from dark to light, largest shapes first.
- Compare it with the grayscale view of your photo in Image reader.
Where it goes wrong
- Starting to mix values in between
- Painting detail before the shapes are right
Done when
- Exactly five values used
- The study is recognizable from a distance
Limited palette: three colors and white color 90 min
The point. Discover how much range a small palette has, and how color harmony comes about.
To paint from
Red, yellow and blue side by side: all of it makeable with three colors and white.
Take it apartYou need
- One yellow, one red, one blue
- White (oil) or just water (watercolor)
How to go about it
- Pick, for instance, yellow ochre, cadmium red light and ultramarine.
- Paint a simple still life using nothing but these colors.
- Mix every color yourself, including your grays and blacks.
- Use the mixer to check whether you are on the right track.
Where it goes wrong
- Reaching for more tubes the moment it gets difficult
- Using black straight from the tube
Done when
- Not a single color used straight from the tube except white
- The whole thing hangs together
Mixing neutrals with complements color 45 min
The point. Make living grays instead of dull mud.
You need
- A blue and an orange-brown
- A red and a green
How to go about it
- Mix a run from blue to burnt sienna in seven steps.
- Find the step that is completely neutral.
- Repeat with red and green.
- Add white to the neutrals and see whether they lean warm or cool.
Where it goes wrong
- Using black to knock a color back, which kills it
Done when
- You have a neutral gray made without black
- You can deliberately push a gray warmer or cooler
Flat wash and graded wash technique 45 min
The point. Lay an even area of color without streaks or water marks.
You need
- Watercolor paper
- Large brush or wash brush
- One color
How to go about it
- Tilt your paper to about fifteen degrees.
- Lay a stroke and catch the thick bead with the next stroke each time.
- Do not stop halfway and do not go back into drying paper.
- Then make a graded wash by adding more water with every stroke.
Where it goes wrong
- Working back into a half-dry wash, which gives you blooms
- Mixing too little paint, so you have to mix more halfway through
Done when
- An area with no visible streaks
- A gradient that lightens evenly
Wet into wet and the right moment technique 45 min
The point. Feel when the paper is ready for the next move.
You need
- Watercolor paper
- Two colors
How to go about it
- Wet an area and let color run in as soon as the shine disappears.
- Repeat at different stages of drying: glossy wet, matte damp, almost dry.
- Write down the result of each attempt.
Where it goes wrong
- Working on glossy wet paper when you want control
- Waiting until it is bone dry when you want soft transitions
Done when
- You recognize the matte stage and can name it
- You can make a soft or a hard edge on purpose
Hard, soft and lost edges edges 45 min
The point. Direct attention with edges instead of with detail.
To paint from
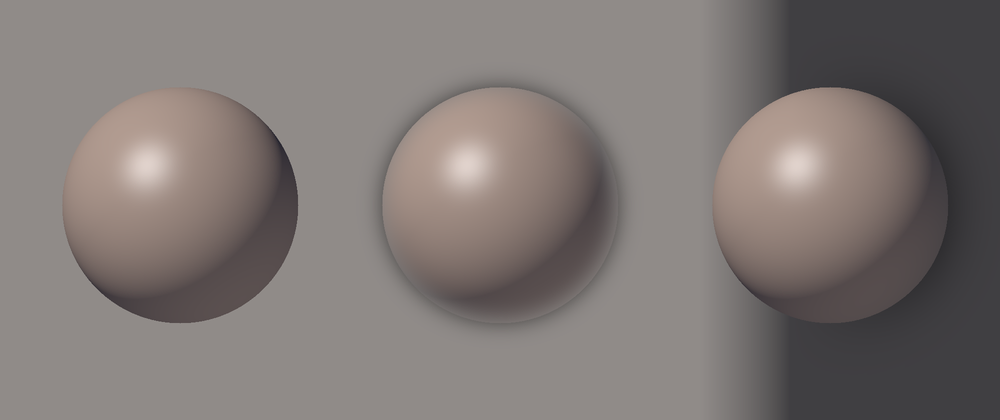
The same sphere with a hard, a soft and a lost edge.
Take it apart
You need
- Two colors
- Brush and a clean rag
How to go about it
- Paint the same simple shape three times.
- Give the first hard edges only, the second soft edges only.
- Mix them on the third: hard where the light strikes the form, lost in the shadow.
- Step back and see which version has the most depth.
Where it goes wrong
- Making every edge equally sharp
- Softening everywhere, which makes the image woolly
Done when
- You can say in your own words where an edge ought to be hard
- The third version reads best from a distance
Four thumbnails of the same subject composition 45 min
The point. Learn that the crop does half the work.
You need
- Small paper
- One color
How to go about it
- Make four sketches of ten by ten centimeters.
- Vary the crop in each one: close, far, high, low.
- Pick the strongest and say why it works.
Where it goes wrong
- Putting the subject in the middle of the frame every time
Done when
- Four clearly different compositions
- A choice you can argue for
Level 3 · Going deeper
0/7Color temperature, edges and layers.
Holding value while working in color value 90 min
The point. Mix colors that are right not only in hue but in value.
You need
- Full palette
- Reference photo
How to go about it
- Make a value study in five tones first.
- Then paint the same thing in color, using those same five values.
- Photograph your result and convert it to grayscale.
- Compare it with your value study.
Where it goes wrong
- Choosing color on hue and losing sight of value
- Keeping the shadows too light
Done when
- The grayscale version looks like your value study
- No single shape jumps out of the value structure
Warm light, cool shadow color 90 min
The point. Separate light from shadow by temperature rather than by darkness alone.
To paint from
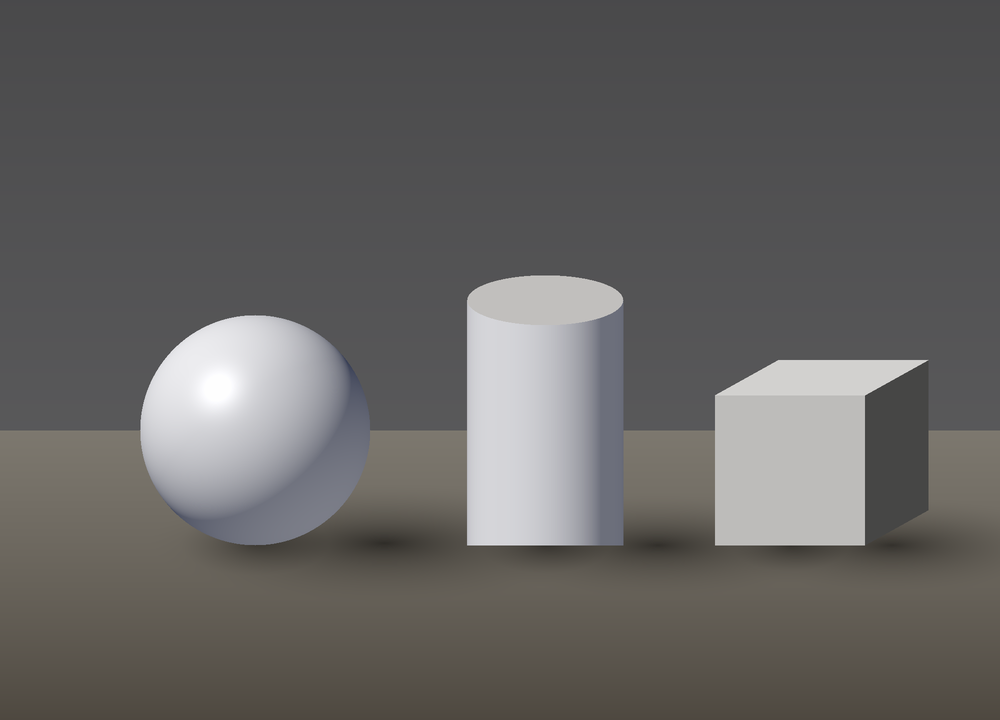
Warm light: the shadows cool down.
Take it apart
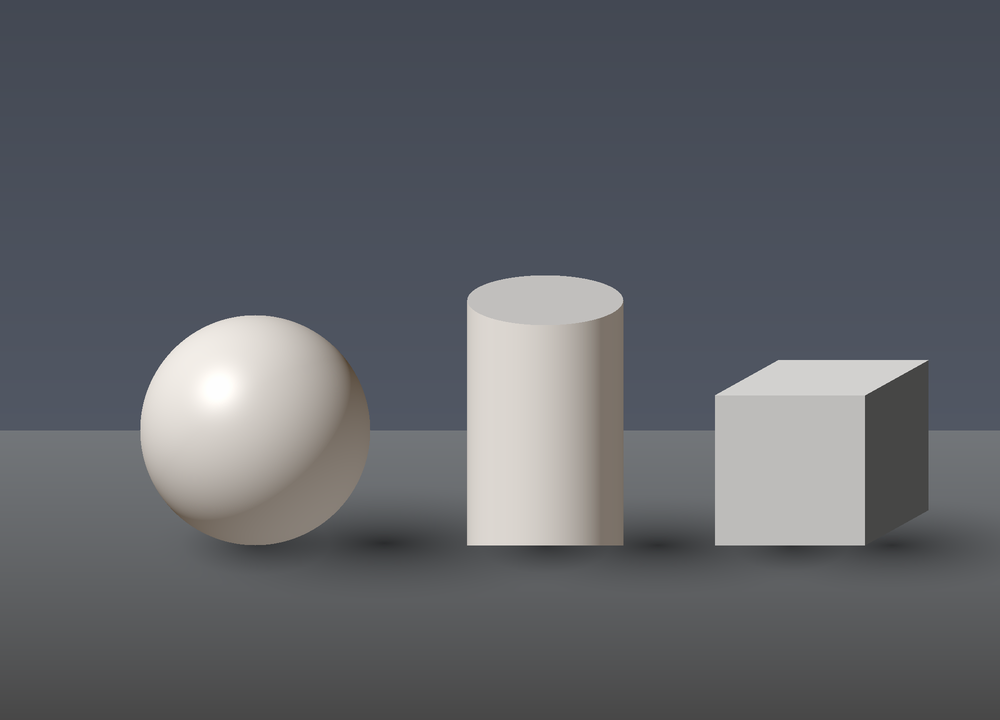
The same set-up under cool light. Everything reverses.
Take it apart
You need
- A white object
- One warm lamp
How to go about it
- Paint a white object under warm light.
- Keep every lit plane warm and every shadow plane cool.
- Use the light and value range to work out your starting colors.
- Then repeat under cool daylight, where everything reverses.
Where it goes wrong
- Making shadows with black alone
- Forgetting that reflected light brings color with it
Done when
- Light and shadow differ visibly in temperature
- The object still reads as white
Complementary underpainting technique 120 min
The point. Get depth into your shadows by laying the opposite color first.
You need
- Watercolor paper
- A palette of at least six colors
How to go about it
- Pick a subject with clear shadow masses, foliage for instance.
- Work out the contrast color for each shadow shape in the mixer.
- Lay that underlayer lightly and thinly and let it dry completely.
- Then glaze the actual color over it in one movement.
- Compare with an area where you skipped the underlayer.
Where it goes wrong
- Making the underlayer too dark, which turns everything muddy
- Glazing before the underlayer is dry
- Stacking more than three layers; the paper goes dead
Done when
- The shadow has visibly more depth than the comparison area
- The underlayer shows through without overpowering the top layer
Saving whites and planning your light technique 90 min
The point. Think ahead, because in watercolor you cannot paint light back in.
You need
- Watercolor paper
- Pencil
- Masking fluid, optionally
How to go about it
- Mark every place that has to stay paper-white in pencil.
- Paint around them instead of over them.
- Work from light to dark in three rounds.
- Use masking fluid only for small, sharp accents.
Where it goes wrong
- Using opaque white to repair things
- Saving too many whites, which makes the image restless
Done when
- The highest lights are unpainted paper
- The image has a clear structure of light
One stroke, one value brushwork 60 min
The point. Trust the first stroke, so that the work stays fresh.
You need
- Flat brush
- A simple subject
How to go about it
- Mix a color completely before you touch the canvas.
- Put the stroke down in one movement and do not correct it.
- Limit yourself to a hundred strokes for the whole piece.
- Count them.
Where it goes wrong
- Touching up and smoothing over
- Reaching for brushes that are too small
Done when
- You stayed under a hundred strokes
- Every stroke is still recognizable
Building a single focal point composition 90 min
The point. Steer the viewer’s eye to one place.
You need
- A reference or a still life
How to go about it
- Decide in advance where the focal point goes.
- Give it the highest contrast, the sharpest edge and the strongest color.
- Deliberately quieten everything outside it.
- Ask someone where they look first.
Where it goes wrong
- The same amount of detail everywhere
- Putting the focal point dead centre
Done when
- Someone else points at your focal point without being told
Master study observation 180 min
The point. Understand a painter’s decisions from the inside.
Where to get your subject
Choose a painting you admire.
You need
- A reproduction of a work you admire
How to go about it
- Pick a work with a clear light effect.
- Analyze the value structure in five tones first.
- Copy the work as accurately as you can.
- Afterwards, write down three things you did not expect.
Where it goes wrong
- Picking a work far beyond your level
- Copying without analyzing
Done when
- The value structure matches
- Three insights written down
Level 4 · On your own
0/5Complex subjects and decisions you make yourself.
Skin tones without a recipe color 150 min
The point. Build skin out of ordinary pigments instead of out of a tube of portrait pink.
Where to get your subject
Ask someone to sit for you, or use a portrait photo of your own in clear side light.
You need
- Limited palette
- A model or a good photo
How to go about it
- Work with the Zorn set-up: yellow ochre, cadmium red, black and white.
- Establish value first, then temperature, and only then saturation.
- Keep the forehead cooler, the cheeks warmer and the chin more yellow.
- Check your edges: jawline hard, hairline soft.
Where it goes wrong
- Using pink as a starting point
- Too much saturation in the shadow
Done when
- The skin looks alive rather than plastic
- You can point out three temperature zones
Taming green in a landscape color 150 min
The point. Make natural greens that do not veer towards sweets.
Where to get your subject
Photograph a patch of foliage in sunlight yourself; photos off the internet rarely have one clear light direction.
You need
- Blue, yellow, earth colors
- A reference or a spot outdoors
How to go about it
- Do not mix a single green straight from a tube of green.
- For each area, make a green and knock it back with its complement or with an earth color.
- Keep distant greens cooler, bluer and lighter.
- Compare your greens with one another; they should all differ.
Where it goes wrong
- The same green everywhere
- Keeping saturation too high in the distance
Done when
- At least six distinguishable greens
- Clear aerial perspective from front to back
Three glazed layers without losing freshness technique 120 min
The point. Build depth of color without the paper going dull.
You need
- Transparent, non-granulating pigments
- Watercolor paper
How to go about it
- Plan in advance which three layers you will lay and why.
- Let every layer dry completely.
- Work with a light hand and one movement each time.
- Stop after three layers, even if it does not look finished.
Where it goes wrong
- Scrubbing with the brush in a drying layer
- Stacking more than three layers
Done when
- The paper is still bright, not dull
- The bottom layer is still visible
Designing a composition from an idea composition 180 min
The point. Move from observation to decisions of your own.
You need
- Sketchbook
- Several references
How to go about it
- Put into one sentence what your work has to express.
- Make six thumbnails that solve that idea in different ways.
- Combine elements from more than one reference.
- Carry out the strongest one at full size.
Where it goes wrong
- Copying one reference wholesale
- Starting without thumbnails
Done when
- Six thumbnails made first
- The finished work matches your sentence
Aerial perspective edges 120 min
The point. Suggest depth with value, saturation and edge sharpness.
To paint from
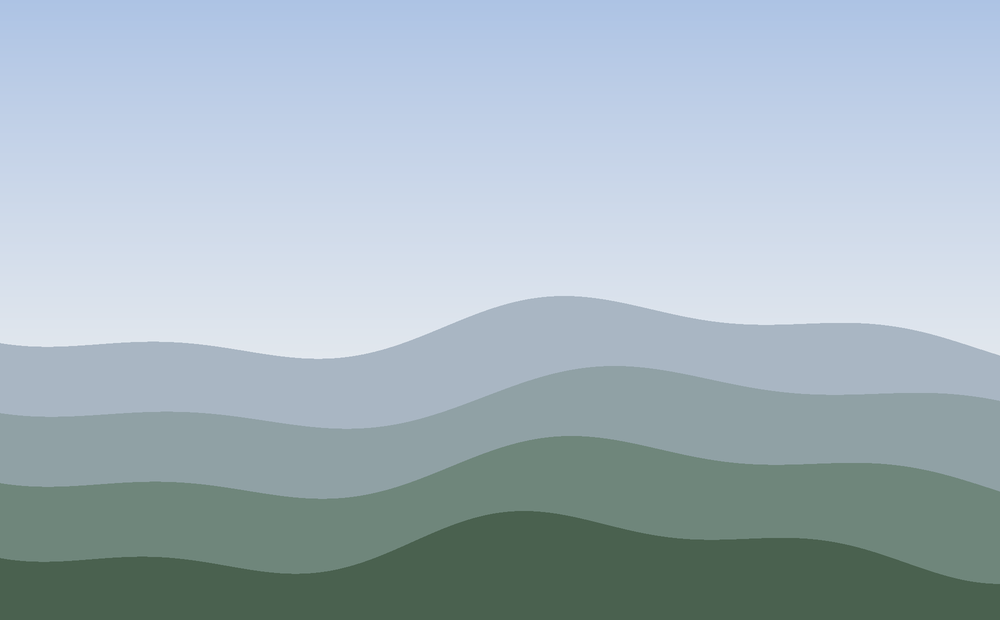
Four planes that go lighter, cooler and flatter towards the back.
Take it apart
You need
- A landscape reference with several planes
How to go about it
- Divide the image into foreground, middle ground and background.
- Reduce contrast and saturation with each plane going back.
- Make edges softer towards the back.
- Keep the sharpest edge in the foreground.
Where it goes wrong
- Working the background up just as sharply
- Using color alone to create distance
Done when
- Three clearly distinct planes
- The background does not push itself forward
Level 5 · Your own work
0/4From studies to work with a direction of its own.
Painting outdoors in two hours observation 120 min
The point. Work fast and decisively under changing light.
Where to get your subject
Outdoors, on the spot.
You need
- Portable kit
- A small format
How to go about it
- Choose your subject within ten minutes.
- Fix the distribution of light in a quick sketch and stick to it, even as the sun moves.
- Lay in the large shapes within the first half hour.
- Stop after two hours, finished or not.
Where it goes wrong
- Choosing a format that is too large
- Carrying on adjusting to the changing light
Done when
- You stopped within the time
- The light effect is consistent
Steering color harmony with a dominant temperature color 180 min
The point. Make a work hang together by letting one temperature dominate.
You need
- Full palette
How to go about it
- Choose a dominant temperature in advance and keep eighty percent of the surface within it.
- Bring the opposite temperature in only at the focal point.
- Mix a trace of the same color into everything to tie it together.
- Judge the whole from three meters away.
Where it goes wrong
- Using as much warm as cool, which makes the image fall apart
Done when
- One temperature visibly dominates
- The accent draws the eye without shouting
A series of three related works composition 3 sessions
The point. Develop a direction of your own instead of making loose studies.
Where to get your subject
Your own subject.
You need
- Your choice
How to go about it
- Choose one subject, one palette and one format.
- Make three works that clearly belong together.
- Vary only the light, the crop or the time of day.
- Hang them side by side and judge them as a whole.
Where it goes wrong
- Making three unrelated works
Done when
- The three works are recognizable as a series
- You can say what your direction is
Judging your work and adjusting it materials 60 min
The point. Learn to read your own work the way someone else would.
You need
- A finished work
- A mirror or a phone
How to go about it
- Look at the work in a mirror; drawing errors leap out.
- Convert it to grayscale and check the value structure.
- Put it three meters away and see where your eye lands first.
- Write down three concrete improvements and carry one of them out.
Where it goes wrong
- Wanting to fix everything at once
- Carrying on fiddling without stepping back
Done when
- Three points written down
- One improvement carried out that you can see